
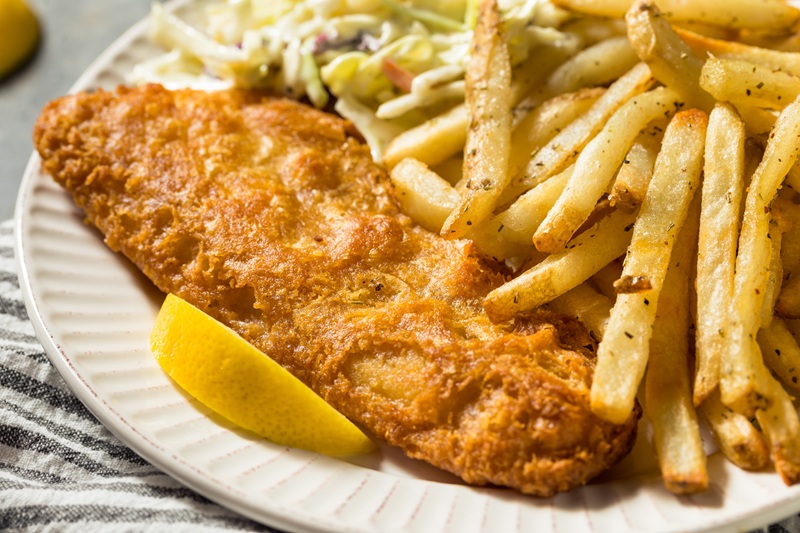
There's a reason fish and chips has survived centuries, crossed oceans, and still manages to feel like the right meal at the right time. It's comfort food with genuine craft behind it. The version most people know — battered fish from a paper bag, eaten standing up — looks deceptively simple. But behind those crispy layers is a sequence of techniques that, once you understand them, you can replicate at home with professional results. Cold batter. Hot oil. Double-fried chips. A tartar sauce made from scratch rather than squeezed from a bottle.
About This Classic British Dish
Fish and chips became Britain's defining street food in the 1860s, when Jewish immigrants from Portugal and Spain brought the tradition of frying fish in batter to London's East End — and a northern entrepreneur named John Lees began selling chipped potatoes from a wooden hut in Mossley, Lancashire. The combination spread rapidly, and by the early 20th century there were over 35,000 fish and chip shops across Britain.
The accompaniments matter as much as the main event. Tartar sauce — despite its French origin — became the definitive British chippy condiment, alongside malt vinegar and mushy peas, a northern English staple made from marrowfat peas that has no real equivalent anywhere else in the world.
Recreating this at home isn't just about following a recipe. It's about mastering a set of fundamentals: temperature control, moisture management, and understanding what makes batter crispy rather than dense. Get these right, and everything else follows.
Watch Chef Shefali Make Fish and Chips (Video Tutorial)
Watch Chef Shefali from ICCA Dubai deliver an end-to-end masterclass on authentic British fish and chips — including the secret to crispy beer batter, the double-fry method for chips, and the perfect house-made tartar sauce.
Ingredients
Serves 1 — scale up proportionally
For the Chips
- Russet or King Edward potatoes — 400g
- Salt — 4g
- Vegetable oil for frying (high smoke point)
For the Fish
- Skinless fish fillets (cod, haddock, or sea bream) — 400–450g
- Plain flour for dusting — 20g
For the Beer Batter
- Plain flour — 120g
- Rice flour — 40g
- Cornstarch — 20g
- Baking powder — 5g
- Salt — 4g
- Cold non-alcoholic beer or sparkling water — 200ml
For the Mint Mushy Peas
- Fresh or frozen peas — 120g
- Butter — 15g
- Fresh mint — 3g
- Lemon juice — 5g
- Lemon zest — 1g
- Salt — to taste
For the Tartar Sauce
- Mayonnaise — 30g
- Capers — 10g
- Gherkins (cornichons) — 10g
- Lemon juice — 5ml
- Fresh dill — 1g
- Fresh parsley — 1g
- Salt — 1g
Equipment Needed
- Deep fryer or large, heavy-bottomed pot
- Cooking thermometer — non-negotiable for temperature control
- Wire rack (for draining — never paper towels)
- Sharp knife and chopping board
- Mixing bowls and whisk
- Baking tray
- Slotted spoon or spider strainer
Step-by-Step Instructions
Step 1 — Prepare the Crispy Beer Batter
In a large mixing bowl, combine all your dry ingredients: plain flour (120g), rice flour (40g), cornstarch (20g), baking powder (5g), and salt (4g). Whisk briefly to distribute evenly.
Pour in 200ml of cold non-alcoholic beer or sparkling water. Mix until the batter reaches a pourable consistency — similar to double cream. A few lumps are perfectly fine. In fact, they're desirable.
Do not overmix. Overmixing develops gluten in the flour, which makes the batter dense and chewy rather than light and crispy. Stir until just combined, then stop.
Place the batter in the fridge while you prepare everything else. Resting time matters — even 30 minutes makes a difference. Overnight is ideal. Cold batter hitting hot oil creates the rapid steam expansion that produces those light, airy bubbles in the crust.
Step 2 — Prep and Double-Fry the Chips
Cut your potatoes into thick, even batons — approximately 1.5cm x 1.5cm. Rinse under cold water, then soak in cold water for at least 20 minutes to draw out surface starch. Rinse again 2–3 times until the water runs clear.
Pat the potato batons completely dry with a clean kitchen towel. Moisture is the enemy of a crispy chip.
First fry — 140°C, 5–6 minutes: Lower the chips in batches into oil at 140°C. This stage is about cooking the potato through — not colour. The chips should be tender all the way through but still pale. Remove and cool completely on a wire rack.
⚠️ Wire rack — not paper towels. Paper towels trap steam underneath the chips, softening the crust you've just built. A wire rack allows air to circulate on all sides, keeping the exterior dry and ready for the second fry.
Second fry — 180°C until golden: When ready to serve, return the cooled chips to oil at 180°C and fry until deep golden and crispy. Season immediately with salt while still hot — cold chips don't absorb seasoning properly.
Step 3 — Make the Mint Mushy Peas
Bring a small pan of salted water to a rolling boil. Blanch the peas for 2–3 minutes — just long enough to cook through and lock in their colour. Drain immediately and refresh under cold water to stop the cooking. This step keeps the peas vibrant green rather than dull and grey.
Mash the peas coarsely — you want texture, not a smooth purée. In a small saucepan over low heat, melt the butter (15g). Add the mashed peas, lemon zest (1g), lemon juice (5g), and salt to taste. Stir gently until warmed through.
Remove from heat and fold in the mint chiffonade (3g). Adding mint at the very end — off the heat — preserves its freshness and prevents it from turning bitter.
Step 4 — Make the Tartar Sauce
In a bowl, combine mayonnaise (30g), roughly chopped capers (10g), finely chopped gherkins (10g), lemon juice (5ml), chopped dill (1g), chopped parsley (1g), and salt (1g).
Mix well and taste. The balance you're looking for: creamy from the mayo, acidic from the lemon and gherkins, herby from the dill and parsley, with a slight briny punch from the capers.
Cover and refrigerate until ready to serve. Tartar sauce improves with 20–30 minutes of chilling — the flavours settle and integrate.
Step 5 — Prep and Fry the Fish
Season the fish fillets lightly with salt on both sides and let them sit for 5 minutes. Then pat them completely dry with kitchen paper. Moisture on the surface of the fish prevents the batter from gripping — this step directly determines whether your batter stays on or slides off.
Dredge each fillet in the dusting flour (20g of plain flour, seasoned with salt and pepper). Shake off any excess. This thin flour coating gives the batter something to grip — without it, the batter slides straight off the fish when it hits the oil.
Heat your frying oil to exactly 180°C. Check with a thermometer. Oil that's too cool produces greasy, soggy fish; oil that's too hot burns the batter before the fish cooks through.
Dip each flour-dusted fillet into the cold batter, letting the excess drip off. Lower gently into the oil — away from you, not toward you — and fry for 4–6 minutes, turning once carefully, until the batter is deeply golden and crisp. The fish should be opaque all the way through.
Remove and drain on a wire rack. Never let battered fish rest on paper towels.
Step 6 — Plate Like a Pro
Lay a sheet of food-grade newspaper or brown paper on the plate for an authentic street-food aesthetic. Place the chips first — stack them loosely so air still circulates rather than stacking flat and trapping steam.
Lay the fish alongside, batter side up. Add a generous dollop of tartar sauce and a spoonful of mushy peas.
Finish with: a pinch of flaky Maldon salt, a sprig of fresh dill, and — for the professional touch — a grilled lemon wedge. Grilling the lemon before squeezing caramelises the surface sugars, softens the bitterness, and releases the essential oils in the skin. It's a small step that makes a noticeable difference.
Chef Shefali's Pro Techniques
.jpg)
Cold Batter, Hot Oil — Always
The temperature contrast between cold batter and hot oil is what creates crispy, aerated batter. If your batter warms up before frying, return it to the fridge. If your oil temperature drops, let it recover before the next batch. These two temperatures matter more than any ingredient.
The Double-Fry Method Explained
Frying chips once at a single temperature is a shortcut — and you can taste it. The first fry at 140°C cooks the potato through and forms an initial crust without adding colour. Cooling the chips completely before the second fry at 180°C is what creates the contrast between a fully cooked, fluffy interior and a shatteringly crispy exterior. There's no shortcut to this result.
Baking Powder — Not Baking Soda
Baking soda (bicarbonate of soda) reacts too aggressively in batter, leaving a slightly soapy, uneven taste in the finished crust. Baking powder is a more controlled leavening agent — it creates the lift you want without the flavour compromise.
Rice Flour + Cornstarch Synergy
Plain flour alone produces a perfectly acceptable batter. But the combination of rice flour and cornstarch alongside plain flour takes crispness to another level. Rice flour fries up lighter and crispier than wheat flour. Cornstarch reduces gluten development and creates a glassy, crackly crust. Together, they produce the kind of crunch that holds even after the fish has been plated.
Wire Rack — Not Paper Towels
Paper towels absorb oil, yes. But they also trap steam underneath whatever you rest on them — and steam is what softens a crust. A wire rack lets moisture escape from all sides, keeping everything crispy until it reaches the plate.
Don't Overcrowd the Fryer
Adding too much to the oil at once drops the temperature dramatically, which means your food sits in oil that's too cool — absorbing fat rather than crisping in it. Always fry in small batches and allow the oil to return to temperature between each one.
Best Fish for Fish and Chips: What to Use (and Avoid)
Best Fish
White, flaky, low-fat fish work best because their structure holds up to battering and high-heat frying without releasing excess fat into the batter.
- Cod: the traditional British choice — mild, flaky, widely available
- Haddock: slightly sweeter than cod, the preferred choice in northern England
- Pollock: a sustainable alternative with a similar texture to cod
- Sea Bream: Chef Shefali's choice — clean flavour, beautiful white flesh, widely available in the UAE
All fillets should be skinless — the skin creates a layer between batter and fish that traps steam and turns soggy.
Fish to Avoid
Fatty fish — salmon, tuna, mackerel — don't work for this dish. Their high fat content prevents the batter from crisping properly and the strong flavour competes with the batter rather than complementing it.
Recipe Variations
Gluten-Free Batter
Replace the plain flour with a gluten-free flour blend. The rice flour and cornstarch are already naturally gluten-free, so the structural change is minimal. Results are excellent — often indistinguishable from the standard version.
Air Fryer Chips
For a lower-oil alternative, toss par-cooked chip batons in a small amount of oil and cook in an air fryer at 200°C for 15–18 minutes, shaking halfway. They won't replicate the deep-fryer result exactly, but they're genuinely crispy and significantly lighter.
Spicy Cajun Batter
Add 1 tsp smoked paprika, ½ tsp cayenne, and ½ tsp ground cumin to your dry batter ingredients. The spice crust that forms during frying adds a warmth that works particularly well with sea bream.
Parmesan-Crusted Variation
Add 2 tbsp of finely grated Parmesan to your dusting flour before coating the fish. The Parmesan melts into the crust during frying, adding a savoury, nutty depth beneath the batter.
What to Serve with Fish and Chips
The classic British accompaniments:
- Mushy peas — already covered, and non-negotiable
- Malt vinegar — a sharp sprinkle over the chips directly from the bottle; do not substitute
- Pickled onions — the proper chippy accompaniment, briny and sharp
- Curry sauce — the northern English chippy staple; thick, mildly spiced, and unexpectedly great
- Coleslaw — creamy coleslaw cuts through the richness of the batter
Drinks: A non-alcoholic lager echoes the beer in the batter. Sparkling lemonade or iced tea both work well — you want something cold and slightly acidic to cut through the fried food.
For those interested in pairing food with craft non-alcoholic beverages, ICCA Dubai's Professional Certificate in Dry Mixology and Bartending covers beverage pairing and mocktail development in a professional format.
Storage & Reheating Tips
Fridge: Fish and chips keep for 1–2 days covered in the fridge — but the batter will lose its crispness. This is unavoidable and simply the nature of fried food.
Reheating — oven only: Place the fish and chips on a wire rack over a baking tray and heat in an oven at 200°C for 8–10 minutes. The wire rack allows hot air to circulate underneath, restoring significant crispness. Never microwave battered fish — you'll end up with a steamed, rubbery crust.
Freezing: Not recommended. Battered fish and double-fried chips do not freeze well — the texture deteriorates significantly upon defrosting.
Want to Go Further?
Fish and chips is a masterclass in technique — temperature control, batter science, moisture management, and precision timing. These are exactly the foundations covered in ICCA Dubai's culinary programs.
If you're exploring professional training, ICCA Dubai's Professional Diploma in Culinary Arts delivers hands-on kitchen training across classical and contemporary techniques, with City & Guilds accreditation and 100% guaranteed job placement. For those already working in hospitality and ready for the next step, the Level 3 Advanced Diploma in Culinary Arts & Supervision covers leadership, menu development, and kitchen management at a senior level.
Not ready for a full diploma? ICCA's Amateur Cookery Course is a practical, hands-on introduction to professional cooking skills — ideal for enthusiastic home cooks who want to cook with real confidence.

.jpg)
.jpg)

.jpg)


